Authentication
The Epidemic Sound API supports three authentication methods. API Key Authentication is recommended for all new integrations.
Quick Comparison
| API Key | Connect (OAuth) | Partner Token (Legacy) | |
|---|---|---|---|
| Status | Recommended — use for new integrations | Active | Legacy — migrate when possible |
| ES account required? | No | Yes — users must log in with their Epidemic Sound credentials | No |
| Token management | Single long-lived API key (backend only) | OAuth access/refresh tokens (client) | Partner Token (backend only) + User Token (client-side, used directly against ES servers) |
| Best for | All server-side integrations | Apps where users have ES subscriptions | Existing integrations not yet migrated |
| Content access | Curated collections or full catalogue | Full library + personalized content | Curated collections or full catalogue |
- Use API Key Authentication if you're starting a new integration, or migrating an existing one. It's simpler and has full parity with Partner Token + User Token combined.
- Use Partner Token Authentication if you have an existing integration and haven't migrated yet. See the migration guide below.
- Use Connect Authentication if your users are existing Epidemic Sound subscribers who want to access their personal library and liked tracks.
Content Access
Your content access level applies to API Key and Partner Token Authentication and is negotiated as part of your partnership agreement (curated collections or full catalogue). With Connect Authentication, users get access to the full library plus their personalized content.
For detailed information on content access levels and managing collections, see the Fundamentals.
API Key Authentication
API Key Authentication is the recommended authentication method for server-side integrations. A single long-lived API key goes directly in every request — no token exchange or credential handshake required.
How it works
Your API key goes directly in the Authorization header of every request:
Authorization: Bearer your-api-key
No token exchange, no separate credential handshake. Unlike Partner Token Authentication — where the User Token was designed to be passed to the client for direct calls — the API key stays on your server and all requests are proxied through your own backend.
Step 1: Get your API key
API keys are provisioned through the Epidemic Sound Developer Portal. If you don't have access yet, see the Getting Started Prerequisites section.
Once you have portal access, your API key can be found under Authentication settings → API keys. Keys are prefixed with epidemic_live_.
Step 2: Make authenticated requests
Add your API key as a bearer token in the Authorization header of every request:
curl -X 'GET' 'https://partner-content-api.epidemicsound.com/v0/tracks' \
  -H 'accept: application/json' \
  -H 'Authorization: Bearer your-api-key'
Step 3: Identify your users
All requests made with an API key share the same credential. To attribute individual requests to your end users, pass a stable user identifier in the x-partner-user-id header. This is not required for the request to succeed, but without it Epidemic Sound cannot attribute activity per user for analytics and rate limiting purposes.
curl -X 'GET' 'https://partner-content-api.epidemicsound.com/v0/tracks/search?term=upbeat' \
  -H 'Authorization: Bearer your-api-key' \
  -H 'x-partner-user-id: user-abc-123'
Use a stable, anonymised identifier for your end user — not their name or email address. The value must be safe to share with third parties.
Endpoint access
API Key Authentication has full endpoint parity with Partner Token and User Token authentication combined. Every endpoint previously accessible with either of those token types is accessible with an API key. Your content access level (curated collections or full catalogue) is still determined by your partnership agreement.
| Endpoint Category | API Key | Partner Token | User Token |
|---|---|---|---|
| Browse & Search | ✓ | ✗ | ✓ |
| Streaming & Download | ✓ | ✗ | ✓ |
| Audio Upload | ✓ | ✓ | ✗ |
| Get Audio by Checksum | ✓ | ✓ | ✓ |
Usage Reporting (/v0/usage) | ✓ | ✗ | ✓ |
| Bulk Reporting | ✓ | ✓ | ✗ |
The one thing an API key cannot do is generate a User Token — but with API Key Authentication, there is no need for one.
Reporting usage
Use POST /v0/analytics/report to report when your users preview, download, or export tracks. Include an explicit userId in each event so activity is correctly attributed per user.
curl -X 'POST' 'https://partner-content-api.epidemicsound.com/v0/analytics/report' \
  -H 'Authorization: Bearer your-api-key' \
  -H 'Content-Type: application/json' \
  -d '{
    "events": [
      {
        "userId": "user-abc",
        "timestamp": "2026-03-30T10:00:00Z",
        "userConnected": false,
        "analyticsEvent": {
          "trackId": "some-track-id",
          "type": "trackPreviewed"
        }
      },
      {
        "userId": "user-xyz",
        "timestamp": "2026-03-30T10:01:00Z",
        "userConnected": false,
        "analyticsEvent": {
          "trackId": "some-track-id",
          "format": "mp3",
          "quality": "normal",
          "type": "trackDownloaded"
        }
      }
    ]
  }'
Migration Guide
This section is for integrations currently using Partner Token Authentication who are switching to API Key Authentication.
What changed
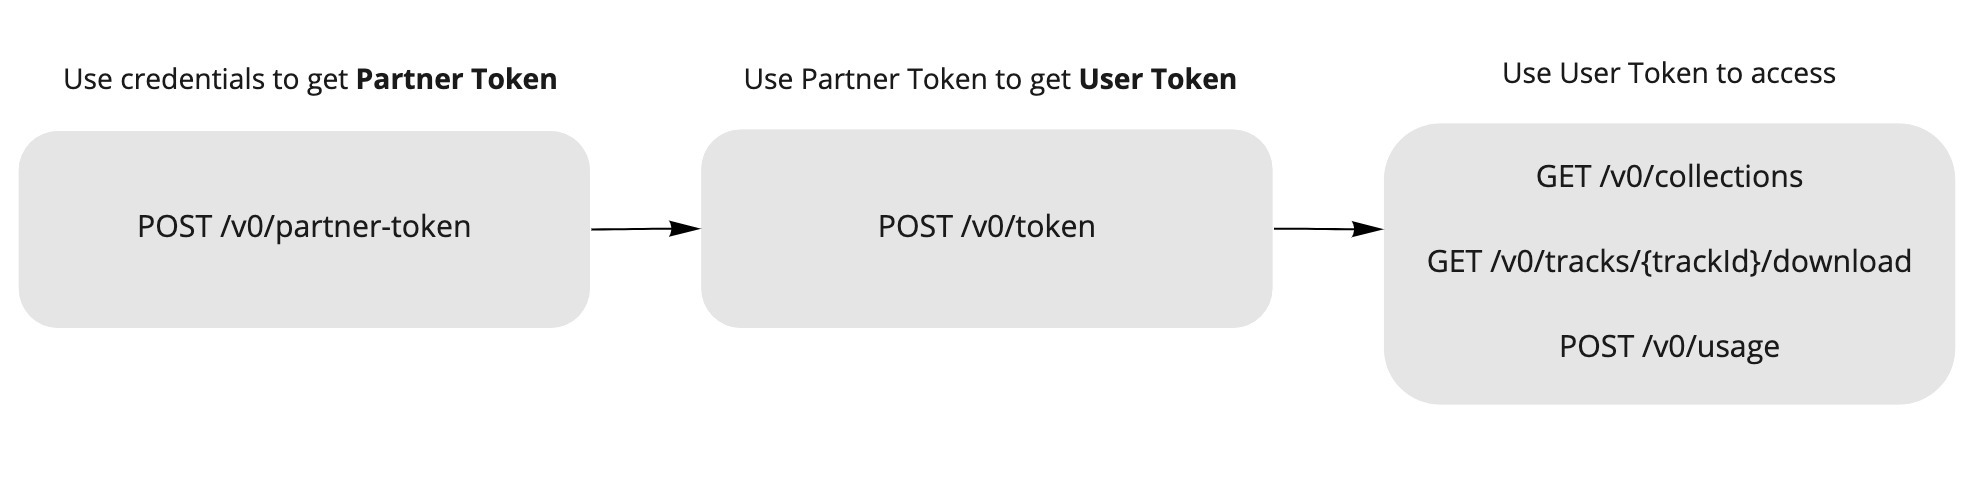
The old flow required two separate API calls before you could make any content request:
- Exchange
accessKeyId+accessKeySecretfor a Partner Token (TTL: 1 day) - Exchange the Partner Token + a
userIdfor a User Token (TTL: 7 days) - Use the User Token for content API calls
API Key Authentication replaces this entire flow with a single credential used directly. It has full parity with both token types — you do not lose access to any endpoint by switching.
Request routing
With Partner Token Authentication, the User Token was safe to pass to the client — your frontend could call the Epidemic Sound API directly without a proxy. With API Key Authentication, the key stays on your server, so if your current integration makes direct API calls from the client, you will need to proxy those requests through your own backend as part of this migration.
Reporting usage
POST /v0/usage works with API key authentication, so you do not need to migrate to a different endpoint. The difference is that with a User Token the user was identified implicitly by the token itself; with an API key there is no per-user token, so pass x-partner-user-id on the request to preserve per-user attribution.
POST /v0/analytics/report is also available for batch event reporting (up to 100 events per request, with explicit userId per event). See Reporting usage above.
Before and after
Before — three steps to make a single API call:
const axios = require('axios')

const API_URL = 'https://partner-content-api.epidemicsound.com'

// Step 1: exchange credentials for a Partner Token (TTL: 1 day)
async function getPartnerToken() {
  const res = await axios.post(`${API_URL}/v0/partner-token`, {
    accessKeyId: 'your-key-id',
    accessKeySecret: 'your-key-secret',
  })
  return res.data.accessToken
}

// Step 2: exchange Partner Token for a User Token (TTL: 7 days)
async function getUserToken(partnerToken, userId) {
  const res = await axios.post(
    `${API_URL}/v0/token`,
    { userId },
    { headers: { Authorization: `Bearer ${partnerToken}` } }
  )
  return res.data.accessToken
}

// Step 3: finally make the actual API call
async function getCollections() {
  const partnerToken = await getPartnerToken()
  const userToken = await getUserToken(partnerToken, 'user-123')

  const res = await axios.get(`${API_URL}/v0/collections`, {
    headers: { Authorization: `Bearer ${userToken}` },
  })
  return res.data
}
After — one step:
const axios = require('axios')

const API_URL = 'https://partner-content-api.epidemicsound.com'
const API_KEY = process.env.EPIDEMIC_SOUND_API_KEY

async function getCollections() {
  const res = await axios.get(`${API_URL}/v0/collections`, {
    headers: { Authorization: `Bearer ${API_KEY}` },
  })
  return res.data
}
Partner Token Authentication (Legacy)
Partner Token Authentication is supported for existing integrations but is no longer recommended for new ones. If you're starting a new integration, use API Key Authentication instead. For existing integrations, see the migration guide above.
Partner Token Authentication is a backend-assisted authorization flow designed for server-side integrations. Your users don't need Epidemic Sound accounts.
How it works
This flow uses two tokens:
- Partner Token — Identifies your application. Store this on your backend only (never expose to clients).
- User Token — Identifies an individual user of your app. This token is safe to pass to the client and was specifically designed to be used directly against the Epidemic Sound API — no proxy required.
Typical integration flow:
- Your backend stores the Partner Token (never exposed to clients)
- Your frontend/mobile app requests a User Token from your backend (once per user session)
- Your backend fetches a User Token from Epidemic Sound using the Partner Token
- Your backend returns the User Token to the frontend
- Your frontend calls Epidemic Sound APIs directly using the User Token (CORS is supported — no proxy needed for content requests)
Token Lifecycle
| Token | Where to store | TTL | How to obtain |
|---|---|---|---|
| Partner Token | Backend (server-side only) | 1 day | POST to /partner-token with your accessKeyId and accessKeySecret |
| User Token | Client (frontend) | 7 days | POST to /token with a userId (using Partner Token in Authorization header) |
Never expose your Partner Token or API credentials on the client side. The Partner Token should only be used in backend-to-backend requests.
Step 1: Get your API credentials
To use the API, you need access to the Epidemic Sound Developer Portal. If you don't have access yet, see the Getting Started Prerequisites section.
Once you have portal access, you can obtain your accessKeyId and accessKeySecret:
- Your
accessKeyIdcan be found in the Developer Portal under Authentication settings → API credentials for anonymous usage - Your
accessKeySecretis only shown once when generated. If lost, you will need to generate a new one from the portal.
Never commit your API credentials to version control. Store them securely on your backend, for example in environment variables or a .env file.
Step 2: Get a Partner Token
With your credentials, request a Partner Token from the /partner-token endpoint. The Partner Token has a TTL (Time To Live) of 1 day, after which a new one needs to be requested.
Step 3: Get a User Token
After a Partner Token has been received, your app will need to request a User Token per unique user interacting with your app. The User Token has a TTL of 7 days. To get a User Token, send a request containing a userId (your unique userId to identify your unique end user) to the /token endpoint. The response of this request will contain the User Token. This User Token will be used in subsequent requests to the API.
Note: you will need to supply the Partner Token in the Authorization header of the request.
curl -X 'POST' 'https://partner-content-api.epidemicsound.com/v0/token' \
  -H 'accept: application/json' \
  -H 'Authorization: Bearer {your-partner-token-value}' \
  -H 'Content-Type: application/json' \
  -d '{ "userId": "e95cc657-adaa-4514-96f8-ce3df57dad0b" }'
You can use any random string for userId. For GDPR compliance, please use a userId suitable to expose to third parties.
Connect (OAuth) Authentication
Connect Authentication uses OAuth 2.0 to let your users log in with their Epidemic Sound accounts. This enables access to personalized content such as liked tracks.
This flow requires your users to have Epidemic Sound accounts. When using Connect, users will be redirected to the Epidemic Sound login page to authenticate.
When to use Connect
- Your users are existing Epidemic Sound subscribers
- You want users to access personalized content (liked tracks, playlists)
- You're building a consumer app where users manage their own ES accounts
OAuth 2.0 is a specification outlined in RFC 6749 that allows third-party services to make requests on behalf of a user without accessing passwords and other sensitive information. If you are unfamiliar with OAuth 2.0, check out Aaron Parecki's "OAuth 2 Simplified" guide.
Simplifying OAuth 2.0 Integration with SDKs
To streamline the process of integrating the OAuth 2.0 flow into your app, we highly recommend leveraging available Software Development Kits (SDKs):
These SDKs are designed to handle the majority of complexities and edge cases, ensuring a smooth integration experience.
Performing Authorization Requests in a System Browser Component
For a secure and standardized user experience, it is crucial to execute the authorization request within a system browser component. We recommend the following components based on the respective platforms:
- Android: Custom Tabs
- iOS 13+: ASWebAuthenticationSession
- iOS before 13: SFSafariViewController
- Others: the default browser
The Oauth2 protocol is used for enabling Epidemic Sound Connect. Epidemic Sound Connect implements the Authorization Code Flow with Proof Key for Code Exchange (PKCE) in order for your application to get authorized.
Step 1: Authorize
| Parameter | Description |
|---|---|
| Authorization Endpoint | https://login.epidemicsound.com/auth/realms/accounts/protocol/openid-connect/auth |
| Token Exchange Endpoint | https://login.epidemicsound.com/auth/realms/accounts/protocol/openid-connect/token |
To start the flow you make a GET request to the Auth URL Authorization Endpoint with the following parameters:
| Parameter | Description |
|---|---|
response_type | OAuth 2.0 response type, code is the only acceptable input at this time. |
client_id | The client ID of your application found in the developer portal. |
redirect_uri | The URI we will redirect back to after an authorization by the user. You need to whitelist the URI of your application in the developer portal. |
code_challenge | Base64 encoding of an SHA256 hashed code_verifier. You can find more information here. |
code_challenge_method | Set to "S256". |
state (optional) | Randomly generated string to prevent CSRF attacks. |
curl -G https://login.epidemicsound.com/auth/realms/accounts/protocol/openid-connect/auth \
-d 'client_id=test-client' \
-d 'response_type=code' \
-d 'redirect_uri=https://example.com/callback&state=15...Fe&code_challenge=zQ...mo&code_challenge_method=S256'
A successful request will redirect the user to the Epidemic Sound login page. After the user signs in, they will see a consent page, asking them to authorize your application. You can add the logo for your app in the developer portal.
Step 2: Receive redirect URI
After the user has authenticated and authorized your application, the user will be redirected to the specified redirect URI in step 1. The redirect URI will contain a single-use authorization code which expires in 10 minutes. It can look something like this:
'https://example.com/callback?state=15...Fe&session_state=43...07&code=36...71'
Note the code query param above, this is the authorization code you need for the next step.
Step 3: Get an access token
To get tokens a POST request to the Token URL endpoint is needed. The content type header must be set to application/x-www-form-urlencoded and the body must contain the following parameters:
| Parameter | Description |
|---|---|
grant_type | Set to "authorization_code" |
redirect_uri | The redirect URI of your application is specified in the developer portal. |
code | The code from the query parameter received with the redirect URI (can only be used once). |
code_verifier | The code_verifier generated in previous step. |
client_id | The client ID of your application found in the developer portal. |
curl -X 'POST' https://login.epidemicsound.com/auth/realms/accounts/protocol/openid-connect/token \
  -H 'Content-Type: application/x-www-form-urlencoded' \
  -d 'grant_type=authorization_code&redirect_uri=https%3A%2F%example.com%2Fcallback&
  code=23a1834a-197a-4ac1-a9da-1bb775101d22.43a20f66-5cfc-492d-8845-33247821e607.
  76f3978b-b9c5-433e-aa39-bea295b7d571&
  code_verifier=ImbASEAFhVK7LTjmD02dPysUYtG2ZlFdMbldWpqyPVW5nQ442cK5sFLqCuvMmNoV&
  client_id=test-client'
{
  "access_token": "eyJhbG…jZXddMA",
  "expires_in": 300,
  "refresh_expires_in": 1800,
  "refresh_token": "eyJhbG…rGUbbU_c",
  "token_type": "Bearer",
  "not-before-policy": 0,
  "session_state": "5c8686d3-0190-4e97-99cd-18add5e1d43d",
  "scope": "email profile"
}
To authenticate a request to the API, use the Authorization header with the access token as the bearer token: Authorization: Bearer [ACCESS_TOKEN].
Refresh an access token
To refresh an access token you need to send a POST request to the Token URL. The content type header must be set to application/x-www-form-urlencoded and the body should contain the following values:
grant_type- Set to "refresh_token"client_id- Your client id found in the developers portalrefresh_token- The refresh token acquired in the previous step
curl -X 'POST' https://login.epidemicsound.com/auth/realms/accounts/protocol/openid-connect/token \
  -H 'Content-Type: application/x-www-form-urlencoded' \
  -d 'refresh_token=eyJhbG...ssw5c&grant_type=refresh_token&client_id=test-client'
{
  "access_token": "eyJhbG…O1sByYg",
  "expires_in": 300,
  "refresh_expires_in": 1800,
  "refresh_token": "eyJhbG…JLQKvY",
  "token_type": "Bearer",
  "not-before-policy": 0,
  "session_state": "5c8686d3-0190-4e97-99cd-18add5e1d43d",
  "scope": "email profile"
}
The response contains a new access token and a new refresh token. Replace the old tokens with the newly created ones.
Log out Epidemic Sound Connect
To log out the account make a POST request to the Log out URL end_session_endpoint with the following data:
client_id- Your client id found in the developers portalrefresh_token- The refresh token acquired in previous step
curl -X 'POST' https://login.epidemicsound.com/auth/realms/accounts/protocol/openid-connect/logout \
  -H 'Content-Type: application/x-www-form-urlencoded' \
  -d 'client_id=test-client&refresh_token=eyJhbG...tGoA'
'
If successful the response body will be empty and a HTTP status code 204.